Dynames Productions

A blog to showcase my creative and technical work. Talk about what I like to talk about.


2 Comments

USB Security – C#

Note: This application is currently on version 1.0
Note 2: Result blog posts on actually hacking the application can be found at the end. There will be link(s) leading to each and every one of them.

Changes made to newest version (Log):

N/A – Program is on version 1 (Base program).

Application Information:

  • Name: USB Security (Temporary name for now)
  • Coded in: C#
  • Development Environment: Visual Studio 2010 (temporarily was also done in 2017)
  • For the following platform(s): Windows

Purpose of the Application:

The purpose of this application is to be lightweight and provide security for any sensitive data that users may put on their storage devices. This is ideal for USBs as that was the intended target, but it can be used with both internal and external HDDs and SSDs.

This console application will allow users to encrypt and decrypt data. It makes use of Rijndael encryption scheme. While encryption is done without any requirements from the user, to decrypt data, a password will be required. If the user fails to provide the correct password 3 times, then the data within the encrypted directory is wiped clean. Password is hashed and stored.

At the moment, the following file formats have been successfully tested with it: GIF, JPG, JPEG, PNG, DOC, DOCX, PDF, RTF, TXT, MP3 and MP4.

Program Functionality:

Step 1: When you open the application, you will be met by the following prompt…

1

The user will put in the drive letter of where the ‘data’ folder is stored. That location also stores the various important files needed for the successful operation of the program.

Step 2: After a drive letter is inputted, the program does a check for a password file and data directory…

2

If successful, the user can simply move on to the main menu screen. Otherwise, the program will automatically create the data directory, and ask the user to create a password they can remember.

Step 3: User is given main menu options…

3

Encryption – ‘E’:

Below is an image of the sole file within the data directory. Take note of the timestamp on the directory, as well as the sole file within that directory. The contents are also shown for reference and comparison for when it is encrypted.

45

Encryption takes place by calling to various functions within the code, that then do the following:

  • Open the file to encrypt.
  • Put it into a buffer stream.
  • Open an encryption stream using Rijndael encryption scheme.
  • What happens under the hood with the encryption scheme (useful link provided in the resources section):
    • Does a sub-byte operation: Takes the contents of the file in bits and through a 16 by 16 matrix table, that contains various hex values, it replaces the original hex values with the new ones.
    • Shifts rows: Think of the hex data of the file in a matrix. So it shifts the hex values over in the various rows. First row maybe left unaffected, second one will see a shift by 1, the one after that will see as shift by 2 and it will only increment.
    • Mix Columns: This step in the encryption works by applying a modulo operation to each individual column in the data matrix. There is a randomized matrix that is used for the operation against the various columns of the data matrix.
    • Add a round key: The algorithm takes an equally large matrix of round key values that are then added to the data matrix and produce new values in the place of the old ones.
    • Note: There are a total of 10 rounds that happen behind the scenes of this process. But on the tenth round, the mix column procedure does not take place.

6

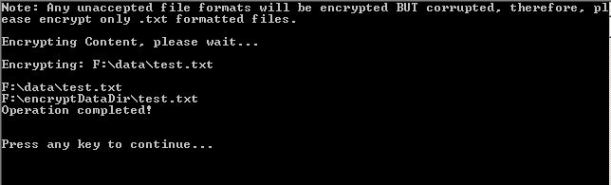
The data is now encrypted and has been put into a new directory named “encryptDataDir” to let the user know to not delete the content in there. Because if they did, then all data will be lost!

Please take note of the timestamps and the now encrypted content of the text file.

78

Decryption – ‘D’:

When the user wants to decrypt, they are given 3 tries to input the correct password. After those 3 tries are up, the encrypted directory is deleted and any data associated in there is wiped.

9

Should they input the correct password, here is the screen they will see next where the actual decryption takes place…

10

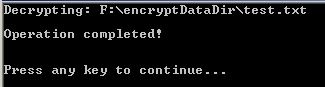
Take note of the timestamps and the file content. While the time stamp has changed as it is a file operation we are executing, the contents of the file are back as they once were. Management of the timestamps happens at a system level versus user level. Meaning the normal user has no control over it, and Windows as a OS tends to keep users out of such control.

1112

Help Screen:

13

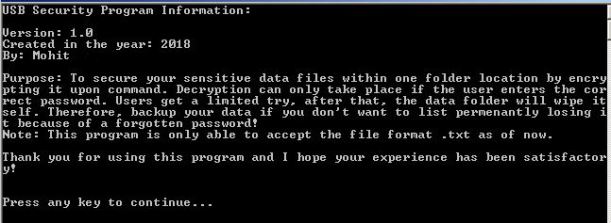
Program Information Screen:

14

Exit – ‘X’:

To exit, the user will simply type ‘x’. At the moment, the application does not automatically encrypt the data directory before quitting as I have defined it in the project scope, but that is an easy fix. That is something I plan to leave for in the future when I make more improvements to the program. Right now, it simply gives a message and then lets the user exit by pressing the enter key.

15

Conclusion:

This was a good little project that spurned from a practical need. What caused this idea to come about was when I thought I had once lost my USB. It made me wonder, what if I had sensitive data on there and someone else got a hold of it?

It made me also realize just how in-depth the world of encryption is. Of course I don’t know its true depth as encryption has been around for centuries. But one thing I can say with certainty is that if you have the option to use these pre-designed encryption algorithms, use them. Don’t try to fix what ain’t broke. I have in my research online during this project seen some messy  and very confusing code in which people try to create or modify existing encryption algorithms from scratch. It’s not an easy task, nor is it a viable task from a business perspective if you work on a time limit.

One thing to keep in mind, from Windows 7 and up, Microsoft has included an encryption method for its users (BUT only on Professional/Enterprise versions of Windows). Linux has ways to encrypt its home directory as well. I’m confident of Ubuntu, however I can’t vouch for other flavors out there.

Overall, there is room for improvement and there are some things I would definitely like to change (or add on) as outlined in the next section. This was a good fun project.

Also for anyone wondering if I ever found that USB, yes. Now you will get a laugh out of this. I searched everywhere except for that one well hidden pocket in my bag which just so happened to have the USB…there were both feelings of relief and silliness :).

Future Changes planned for future versions:

  • Implement Salt Hashing as opposed to the simple Hashing it is using right now.
    • Salt Hashing makes it more difficult to crack a hash as it makes every hash unique.
  • Implement ways for the program to sweep through multiple levels of folders/directories as opposed to 1 level it has right now.
  • Implement a logging system to keep track of various activities:
    • When a password file is created (Date & Time).
    • When the data was encrypted (Date & Time).
    • When the data was decrypted (Date & Time).
  •  Implement a security ques/ans file:
    • Contains a security question and answer. User will get a pre-selected choice of options for questions, they must type the answer in.

Resources:

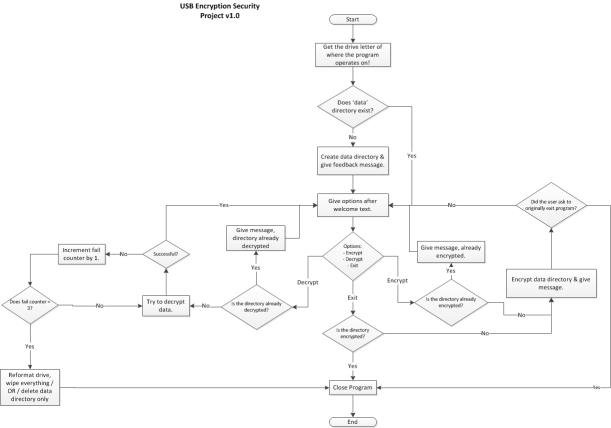
Additional Material:

I thought to add this in as I was updating the future improvements list. Below is the flowchart you will find for the program as I was planning this out while working on the algorithm.

programFlow_v1

Hacking it


2 Comments

Energy Monitoring Application – C#

Note: This is only meant to be a written demo explaining certain aspects of the application. Since this device uses a special hardware component that is no present with me, random dummy values will be used for voltage measure readings and calculations.

Application information:

  • Name: Energy Monitor
  • Coded in: C#
  • Development Environment: Visual Studio 2010
  • Platforms: Windows
  • Special Note: This application is meant to be interfaced with a hardware component that has various input and output plugs to it. It would plug into the wall outlet, there the appliance you wish to measure would plug into the hardware device. Through a transmitter, it transmits information to a USB receiver plugged into your computer.

Purpose of the Application:

The purpose of this application is to be able to measure a certain amount of energy being used up by an appliance in your home and give you a general overview on how much that appliance would cost you to maintain in your house by the seconds, minutes, hourly, daily, monthly and yearly.

Program Functionality:

Initial Screen:

initialScreen

The image above is the initial screen that a user would be met by upon opening the application. Below is a list of what the buttons do:

  • Begin Analysis: Takes the user to another screen where they can begin analysis on a selected appliance.
  • Load Results: Allows the user to load a previously saved report for further analysis.
  • Help: Explains the function of the buttons on screen.
  • Credits: Displays the various people involved and their position on the project.
  • Exit: Closes the application.

Main Screen:

mainScreen_1

The image above is the main screen that the user is presented with after getting past the initial window. Below is a list of the button functions:

  • Program New monitor: Allows the user to set a certain memory value for a particular device (for example: Value 34 maybe for a desk side lamp).
  • Calculate Report: Allows user to input their base electrical bill amount that will be used to calculate various monetary values for user consideration.
  • New Analysis: Starts a new analysis.
  • Load Results: Allows the user to load a previously saved report for further analysis.
  • Graph Results: Visually real time graph the result of the analysis.
  • Home: Goes back to the initial screen.
  • Help: Displays step by step procedure to enact for an analysis. This dialog window also explains additional button options such as “Graph Results”.
  • Exit: Closes program.

mainScreen_2

The above image is the same screen as the main screen, but there are additional fields and buttons in there. The additional field are the following:

  • Fields:
    • A field to input base cost of the electrical bill.
    • A text box to show the calculated values, what the input value was and when this analysis was conducted.
  • Buttons:
    • Retrieve data: This button retrieves the input base cost value and uses it in the calculation of the different costs associated with the appliance being measured for.
    • Save Results: Gives the user the option to save the analysis report as a “.rtf” file that can be re-opened in the application, or in any compatible text editor.

As the user also has the option to graph the results, below is what that would look like:

mainScreen_3

The following is what has changed in the above screen:

  • A real time graph is introduced displaying the costs of the appliance over time.
  • Buttons:
    • Take Snapshot: Takes a still image of the graph and saves it for future reference.
    • Open Snapshot: Opens any previously saved snapshots.
    • Magnify Graph: Allows the user to magnify the graph with the options to display in the following time metrics.
      • Seconds
      • Minutes
      • Hours

Conclusion:

This was a great senior project for my University (sort of like a thesis). It was also my first project done in C#, that meant a lot of learning was involved in the process of making this application to go along with the hardware aspect, though that particular part of the application was handled by someone else. It was both challenging and satisfying to work on an application I consider to be huge in magnitude for a first timer of the C# language.


2 Comments

Movies & Video Games Inventory – Database

Note: This is only meant to be a written demo explaining certain aspects of the database application.

Application information:

  • Name: Movies & Video Games Inventory Application
  • Coded in: SQL
  • Database Engine: Oracle11g
  • Development Environment: SQLPlus & Apex
  • Platforms: Any that is able to run Oracle11g & has a web browser to use Apex with.

Purpose of the Application:

The purpose of this application is to store an inventory of different movies and video games in the user’s possession. Then through the web graphical interface designed in Apex, the user will be able to view the information in the database.

Program Functionality:

Database Structure – ERD:

Note: If observed closely, you will notice that there are two relationship crow’s feet extending to Movie table from Genre table, and two to Video Game table. This is because of the two genre columns in the Movie and Video Game table. The two columns are there to acts as a primary and secondary genre.

Movie_VidGames_Inventmanagment_DBERD

Tables in SQLPlus:

sqlPlus_Tables

Viewing entries in Apex:

viewingMovies

In the image above, the entries are shown via a table list format. Initially all the entries are shown, but there are a series of buttons at the top that allow for users to view entries by genres. There is also a search bar to let them directly search for any entry they maybe looking for.

The table also has the feature of organizing data through column priority and searches. For example, if you wanted to organize the columns in ascendant format through the ID column, you can. If you wanted to search the columns for a particular entry, you can.

The user also has the option to view entry details by pressing on the ID of the entry they are looking for.

Majority of the same options are applicable to the Video Games tab.

Viewing entry details in Apex:

viewingMovieDetails

The details will display the information stored in the various columns within the Movie table. As the information is spread across various tables and stored as numbers in the Movie table aside from a few things, it is retrieved using joins and displayed in the appropriate column. This page also displays the movie front and back cover in full size.

Majority of the same features are applicable to the Video Games tab.

Room for Improvement:

This database program can definitely be improved upon as I see it right now. Some thing(s) I see that could use improvements are:

  • Add an ability to keep track of whether you have loaned the item to someone or not.
    • Who have you loaned it to?
  • Improving UI design
  • Potentially adding in some metrics features via Apex.
  • Add in edit, insert & delete features for general movie and video game entries (features already exist for their image covers)
  • Look to compressing down the image sizes to help save space in database as well as display at a good quality.

Conclusion:

This was a great project to work on in my down time. It is also quite practical for personal uses as it helps keep an inventory of my movies and video games. No doubt in the future this will see some modifications, and maybe a brand new face to the interface.


Leave a comment

LightExistence App – Android

Note: This is only meant to be a written demo explaining certain aspects of the application.

App can be downloaded via this URL – https://play.google.com/store/apps/details?id=com.dynamesproductions.montymason.lightexistence_depression_self_help

Application information:

  • Name: LightExistence
  • Coded in: Java, XML & SQL
  • Development Environment: Android Studio
  • Platforms: Android Devices (Phones & Tablets)

Purpose of the Application:

The purpose of this application is to provide tools & content for those that are depressed, to help them overcome their depression.

I created this application due to my personal experiences and lessons with depression. There are several fantastic applications that are coded to provide useful tools, but I never found any to be centered around the themes of inspiration and motivation. This created an opportunity for me to help others with my programming knowledge, and create an app that would prove to be my first Android app.

Program Functionality:

The program contains the following features, also linked to their original posts:

  • Diary: Where you can keep track of events in your life impacting your mood, you can also note any overall changes that may have taken place in your mood.
    • The data from the entries is usually extracted from the appropriate fields and saved into appropriate database tables.
    • That data can also be retrieved to view as a list (a collection) of past diary entries.
      • Upon selection they can be edited, or deleted.
  • Tests: Contains various tests to help measure your depression. The results can be saved into the database for later viewing then to keep track of your progress should you desire.
  • Activities: Opening this leads to a screen where saved activities can be viewed that are extracted from the database.
    • These activities can either be created from scratch or suggested to you.
    • The purpose here is to provide activities that could help with your depression.
  • Media:
    • Music Videos: Contains a collection of music videos on YouTube that can be listened to via default browser or the YouTube app.
    • Guided Meditation Videos: Contains a collection of guided meditation videos on YouTube that can be listened to via default browser or the YouTube app.
    • Inspirational Videos: Contains a collection of inspirational videos on YouTube that can be watched via default browser or the YouTube app.
    • Articles: Contains a collection of helpful articles on depression, they can be viewed via the default browser.
  • Thought of the Day: Randomly generates a positive thought of the day message upon selection.
  • Inspirational Quotes: Randomly generates an inspirational quote upon selection. Great for those down moments where you need a pick me up.
  • Resources: Contains useful extra resources to help with your depression.

Room for Improvement:

This app can definitely be improved upon. Some thing(s) I see that could use improvement(s) is/are:

  • Improving UI design

Conclusion:

This was a great first app to work on that is designed to help others with depression, but it also helped me as I made it during a tough period in life. It was also a great educational project that helped introduce me to the world of android apps from a developer’s standpoint versus a user. The project also presented many challenges, and overcoming them all one by one felt great as it does for any problem solving.

Screenshots:


This slideshow requires JavaScript.


Leave a comment

LightExistence Guide & More App – Android

Note: This is only meant to be a written demo explaining certain aspects of the application.

App can be downloaded via this URL – https://play.google.com/store/apps/details?id=com.dynamesproductions.montymason.lightexistence_depression_miniguideandmore

Application information:

  • Name: LightExistence: Guide & More
  • Coded in: Java & XML
  • Development Environment: Android Studio
  • Platforms: Android Devices (Phones & Tablets)

Purpose of the Application:

The purpose of this application is to provide tools & content for those that are depressed, to help them overcome their depression. This is my second app that was developed alongside the first, “LightExistence”.

I created this application due to my personal experiences and lessons with depression. There are several fantastic applications that are coded to provide useful tools, but I never found any to be centered around the themes of inspiration and motivation. This created an opportunity for me to help others with my programming knowledge..

Program Functionality:

The program contains the following features:

  • Mini-Guide: A guide written by me on depression that is primarily intended to inspire and motivate.
  • Motivational Tips: Randomly generated motivational tips to help you stay motivated.
  • Resources: Contains useful extra resources to help with your depression.

Room for Improvement:

This app can definitely be improved upon. Some thing(s) I see that could use improvement(s) is/are:

  • Improving UI design

Conclusion:

This was a great second app to work on that is designed to help others with depression, but it also helped me as I made it during a tough period in life. This project also gave me an opportunity to express my thoughts and beliefs on depression and how beneficial it can be within certain circumstances due to its trans-formative properties in the form of a mini-guide.

Screenshots:

This slideshow requires JavaScript.


Leave a comment

Bulk Tweet Twitter Application – Java

Note: This is only meant to be a written demo explaining certain aspects of the application.

Application information:

  • Name: Bulk Tweet Twitter Application
  • Coded in: Java
  • External Libraries?: Yes
    • Twitter4j
  • Development Environment: Netbeans IDE
  • Platforms: Windows

Purpose of the Application:

The purpose of this application is to be able to tweet out your tweets in bulk. Instead of having to copy and paste your tweets individually, or schedule them weekly for individual release, you can simply load them in the program quickly and with the click of a button tweet it all out.

I created this application due to a rising personal need for it. There are several fantastic scheduling applications, but I didn’t find any that would allow the tweet timing to be scheduled on a recurring basis. Instead it was a one time schedule feature mostly. This created a growing need for me when having to put out tweets in bulk.

Program Functionality:

Initial Screen:

initial_Screen

The image above is the initial screen that a user would be met by upon opening the application. Below is a list of what the buttons do:

  • Access Twitter:
    • New User:
      • If you are a new user, the program displays a message dialog box. In that dialog box is an authorization URL for this application. When the user goes to that URL, they must login with the account they plan to use the program for.
      • Once inside their account, they will be granted a pin code that must be copied and pasted into a text field in the same dialog box that gave the authorization URL.
      • Once the pin code is verified, the user will be allowed to proceed to the next screen of the application.
    • Returning User: Simply reads the access information (tokens) file and if they are valid, twitter and the program will grant the user access to the next screen.
  • Delete Access Tokens: As this program only supports one user, it is important to be able to get rid of the previous access information in order to create new one for another account. If the user wanted to revert back to the old account, they would have to get rid of the information and recreate it.
  • About Program: In a message dialog, displays the purpose of the program.
  • Need Support?: Relays message on how to email for support (ie. Including error messages, email address, etc.).
  • Close: Closes the application.

Main Screen:

main_Screen

The image above is the main screen that the user is presented with after getting past the initial window. Below is a list of the button functions:

  • Tweet: Allows users to type in a tweet in the text field to the left of the button, upon clicking the button it tweets out the contents of that text field to their home timeline.
  • Update Info: Fetches information from the user’s home timeline and displays it to the big text field to the right.
  • Bulk Tweet: Opens another window with the features to bulk tweet (the main feature of this program).
  • Need Support?: Relays message on how to email for support (ie. Including error messages, email address, etc.).
  • Go Back: Goes back to the initial screen.
  • Close: Closes program.

Bulk Tweet Screen:

bulkTweet_Screen

The image above contains two windows. One is the main screen, while the foreground window is the bulk tweeting window. Below is a list of the button features:

  • Open File: Opens file containing your various tweets that you wish to bulk tweet. Once you open them, they will display on the big text box on the right alongside the file path.
  • Bulk Tweet:
    • When a file is opened, the contents of the different tweets are saved inside of a String ArrayList.
    • That array list is called inside of a FOR loop and executed as a status update.
      • The FOR loop executes for how many ever lines there are in the file imported into the program. A number of lines count is done during import of the file.
  • Instructions: Explains the procedure for bulk tweeting.
  • File Guidelines: Displays a message dialog box explaining guidelines as to how your “.txt” file should be formatted.
  • Close: Closes window.

Room for Improvement:

This program can definitely be improved upon as I see it right now. Some thing(s) I see that could use improvements are:

  • Adding functionality for multi-user usage.
  • Improving UI design
  • Improving access token storage methods

Conclusion:

This was a nifty little program to work on that helps alleviate a big hassle for me. It was also a great educational project that helped introduce me to the twitter4j library. The project also presented many challenges, and overcoming them all one by one felt great as it does for any problem solving. For those curious, the challenges were primarily related to the twitter4j library.

If you decide to make something like this yourself, it should be noted that be careful not to spam twitter. In spamming twitter with advert links and nonsensical tweets, you risk getting your account suspended or banned.


Leave a comment

What I have been up to

Hey everyone,

There has been quite a bit of a gap since my last post on here. I have been busy working on something that I thought to make after running into an issue with twitter.

For those that use it will know that twitter has a schedule feature where you can schedule to tweet out a tweet. BUT that scheduler never had the ability to make it recurring (at least not one I could find). Now while my solution may not be as elegant in looks, it is still quite functional.

I have been working on a Java application with the integration of Twitter4j library to create a program capable of sending out tweets in bulk.

Why design this?

To simply save me time. When my list of tweets was small, it was bearable to copy and paste them all in. Or even schedule them every week. But now that the list has expanded, it is clear that individually scheduling them every week or copying and pasting them every time is not going to be efficient.

The program is quite simple in design, but powerful in its main focus of bulk tweeting. Once I have ironed out the more finer details of the program, I may release some screenshots and maybe a written demo on here for any curious programmers out there. Maybe this is something then you could make yourself as well.

Don’t know yet if this is something I will actually be able to release to the world since I will have to look at any potential legal ramifications. But hey, if I release a written demo here, it will be a starting point for any other programmer to make their own bulk tweeting software :).

~ Monty

________________________________________________________________

Check out my other blog here: LightExistence.


Leave a comment

LightExistence App Blog

Hey everyone,

After finally finishing the free motivational LightExistence Android app, I prepared a new blog to help promote it as well as discuss some topics on there that I won’t on here.

The topics I’ll talk about on there will relate to mental health and motivation primarily as the goal is to help those who are in need of motivation. To help those who feel empty inside, find that they have difficulty again finding the passion they once had.

It would be fantastic if you would take a minute or two to pop on over there real quick and perhaps drop a follow. Not only will that help the blog grow but also help grow the awareness for my free app, and potentially help more people that way.

Link to LightExistence blog: https://lightexistenceblog.wordpress.com/

Thanks,

~ Monty