Note: This application is currently on version 1.0
Note 2: Result blog posts on actually hacking the application can be found at the end. There will be link(s) leading to each and every one of them.
Changes made to newest version (Log):
N/A – Program is on version 1 (Base program).
Application Information:
- Name: USB Security (Temporary name for now)
- Coded in: C#
- Development Environment: Visual Studio 2010 (temporarily was also done in 2017)
- For the following platform(s): Windows
Purpose of the Application:
The purpose of this application is to be lightweight and provide security for any sensitive data that users may put on their storage devices. This is ideal for USBs as that was the intended target, but it can be used with both internal and external HDDs and SSDs.
This console application will allow users to encrypt and decrypt data. It makes use of Rijndael encryption scheme. While encryption is done without any requirements from the user, to decrypt data, a password will be required. If the user fails to provide the correct password 3 times, then the data within the encrypted directory is wiped clean. Password is hashed and stored.
At the moment, the following file formats have been successfully tested with it: GIF, JPG, JPEG, PNG, DOC, DOCX, PDF, RTF, TXT, MP3 and MP4.
Program Functionality:
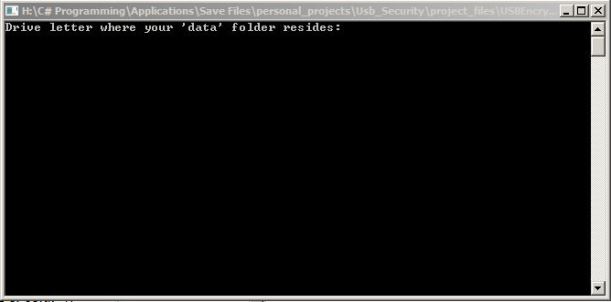
Step 1: When you open the application, you will be met by the following prompt…

The user will put in the drive letter of where the ‘data’ folder is stored. That location also stores the various important files needed for the successful operation of the program.
Step 2: After a drive letter is inputted, the program does a check for a password file and data directory…

If successful, the user can simply move on to the main menu screen. Otherwise, the program will automatically create the data directory, and ask the user to create a password they can remember.
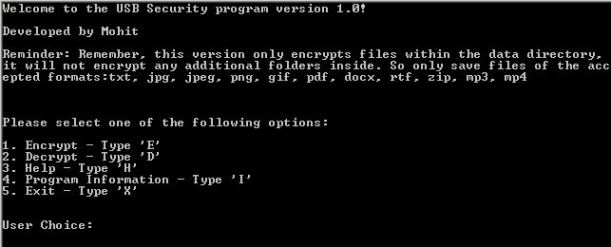
Step 3: User is given main menu options…

Encryption – ‘E’:
Below is an image of the sole file within the data directory. Take note of the timestamp on the directory, as well as the sole file within that directory. The contents are also shown for reference and comparison for when it is encrypted.


Encryption takes place by calling to various functions within the code, that then do the following:
- Open the file to encrypt.
- Put it into a buffer stream.
- Open an encryption stream using Rijndael encryption scheme.
- What happens under the hood with the encryption scheme (useful link provided in the resources section):
- Does a sub-byte operation: Takes the contents of the file in bits and through a 16 by 16 matrix table, that contains various hex values, it replaces the original hex values with the new ones.
- Shifts rows: Think of the hex data of the file in a matrix. So it shifts the hex values over in the various rows. First row maybe left unaffected, second one will see a shift by 1, the one after that will see as shift by 2 and it will only increment.
- Mix Columns: This step in the encryption works by applying a modulo operation to each individual column in the data matrix. There is a randomized matrix that is used for the operation against the various columns of the data matrix.
- Add a round key: The algorithm takes an equally large matrix of round key values that are then added to the data matrix and produce new values in the place of the old ones.
- Note: There are a total of 10 rounds that happen behind the scenes of this process. But on the tenth round, the mix column procedure does not take place.

The data is now encrypted and has been put into a new directory named “encryptDataDir” to let the user know to not delete the content in there. Because if they did, then all data will be lost!
Please take note of the timestamps and the now encrypted content of the text file.


Decryption – ‘D’:
When the user wants to decrypt, they are given 3 tries to input the correct password. After those 3 tries are up, the encrypted directory is deleted and any data associated in there is wiped.

Should they input the correct password, here is the screen they will see next where the actual decryption takes place…

Take note of the timestamps and the file content. While the time stamp has changed as it is a file operation we are executing, the contents of the file are back as they once were. Management of the timestamps happens at a system level versus user level. Meaning the normal user has no control over it, and Windows as a OS tends to keep users out of such control.


Help Screen:

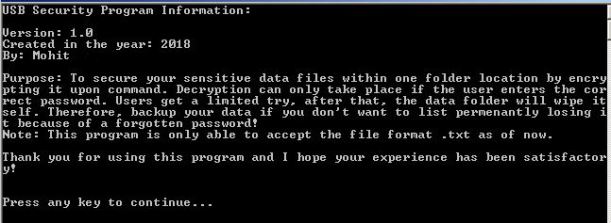
Program Information Screen:

Exit – ‘X’:
To exit, the user will simply type ‘x’. At the moment, the application does not automatically encrypt the data directory before quitting as I have defined it in the project scope, but that is an easy fix. That is something I plan to leave for in the future when I make more improvements to the program. Right now, it simply gives a message and then lets the user exit by pressing the enter key.

Conclusion:
This was a good little project that spurned from a practical need. What caused this idea to come about was when I thought I had once lost my USB. It made me wonder, what if I had sensitive data on there and someone else got a hold of it?
It made me also realize just how in-depth the world of encryption is. Of course I don’t know its true depth as encryption has been around for centuries. But one thing I can say with certainty is that if you have the option to use these pre-designed encryption algorithms, use them. Don’t try to fix what ain’t broke. I have in my research online during this project seen some messy and very confusing code in which people try to create or modify existing encryption algorithms from scratch. It’s not an easy task, nor is it a viable task from a business perspective if you work on a time limit.
One thing to keep in mind, from Windows 7 and up, Microsoft has included an encryption method for its users (BUT only on Professional/Enterprise versions of Windows). Linux has ways to encrypt its home directory as well. I’m confident of Ubuntu, however I can’t vouch for other flavors out there.
Overall, there is room for improvement and there are some things I would definitely like to change (or add on) as outlined in the next section. This was a good fun project.
Also for anyone wondering if I ever found that USB, yes. Now you will get a laugh out of this. I searched everywhere except for that one well hidden pocket in my bag which just so happened to have the USB…there were both feelings of relief and silliness :).
Future Changes planned for future versions:
- Implement Salt Hashing as opposed to the simple Hashing it is using right now.
- Salt Hashing makes it more difficult to crack a hash as it makes every hash unique.
- Implement ways for the program to sweep through multiple levels of folders/directories as opposed to 1 level it has right now.
- Implement a logging system to keep track of various activities:
- When a password file is created (Date & Time).
- When the data was encrypted (Date & Time).
- When the data was decrypted (Date & Time).
- Implement a security ques/ans file:
- Contains a security question and answer. User will get a pre-selected choice of options for questions, they must type the answer in.
Resources:
- To better understand Rijndael encryption: https://www.youtube.com/watch?v=gP4PqVGudtg
- More on Rijndael encryption:
Additional Material:
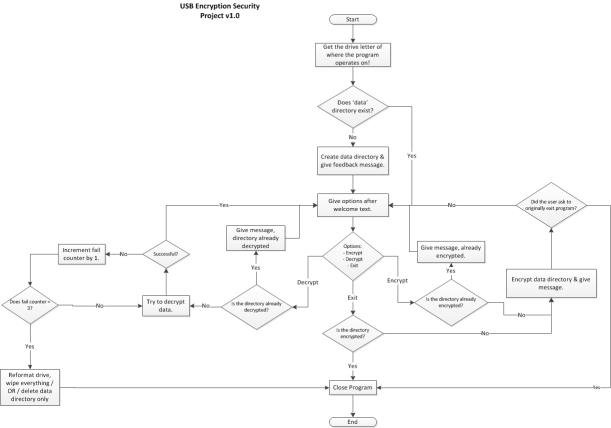
I thought to add this in as I was updating the future improvements list. Below is the flowchart you will find for the program as I was planning this out while working on the algorithm.


